Tuesday, April 30, 2013

April Component of the Month Reveal-Headpins!

Today is the big reveal and I am super excited to see what the guest designers and the AJE team members came up with. Because of the last minute switcheroo, my having a show the 1st weekend of April and not mailing until after that, it was a very short design month for everyone.

There were two different headpin design choices. 

Murrini:


or Spirals:


While I sent each participant two headpins, they were only required to use one.

Without further ado, let's take a look at what everyone made:

Guest Designers:

AJE Team:

Grab a bag of popcorn and enjoy the show(case) of designs

-Jen Cameron


Monday, April 29, 2013

Beads Do Grow On Trees

It's true!  Ok, sort of.  Please note, I forgot my camera at home when I was unloading the kiln on Friday.  Sorry for the cell phone-quality photos.  Oops!
Anyway, after I've glazed all my bisque they have to be put into the kiln in a manner in which they won't touch one another when firing (or they'll stick).  I have these nifty bead racks and trees that help me with that!  They come with special wires that can withstand REALLY hot temperatures. Up top is a bead rack.  Some people really jam these things full but I prefer to leave enough space to ensure I'm not making any conjoined beads.
This is what they look like when they are loaded into the kiln.  The pieces on the bottom are all unglazed on the back.  They fire directly on the kiln shelf.

This is a bead tree!  See, I didn't lie to you!  Beads DO grow on trees...kind of.
And here is my top shelf.  I typically have more on this shelf but I didn't make as many round beads this time.  You'll notice I could really use a bigger top shelf.  That's on my to-purchase list.

Loading the kiln usually takes over an hour.  It really depends on how many things I'm putting in there.  I try to be as strategic as possible.  Sometimes I load things only to find I could have added more.  Then I take things out, move them around and put them back in.  Sometimes I have epic fail and knock over a few racks when adding another.  It's tedious.

Now you want to know where you can buy these bead racks and bead trees?  I get mine from my local pottery warehouse, Ceramic Supply.  Luckily, I live close enough to drive there but they do ship!  You can also get some special ones made by Marla James, over at Bisque Bead Supply.

And that is how beads grow on trees!

Happy Beading!

Diana P.
Suburban Girl Studio LLC

Sunday, April 28, 2013

Earring Challenge Reveal 8 - Weeks 15 & 16/52

Welcome to the 8th reveal for the AJE challenge - how are you all doing...still going strong with your designs? I think I've just about caught up with my backlog and hopefully you're all gaining inspiration from each others designs.

If you're blogging about your designs then don't forget to add your link at the bottom of this post. Today's post is a bit of a joint effort and whilst I'm writing it the featured entries have been chose by Linda Landig.

First up are these pretty earrings by 'Sundance Gems' called 'Summer Skies' using Paper beads by Gillian McMurray, light blue Swarovski pearls and sterling silver earwires. I've used Gillian's paper beads myself and not only do they look great but they are light as a feather so a great choice for anyone who can't wear heavy earrings.


Next we have a great fun pair by Claire Lockwood of 'Something To Do Beads' using polymer clay House beads which she made herself - aren't they cute...?


Linda's third choice are these  hand-cut and enameled copper shapes by Angela Gruenke of 'Contents Jewelry' which have a lovely organic feel.


And finally we have a pair of very pretty hand stamped earrings by Alicia Marinache of 'All Pretty Things' made of  Aluminum flat wire and bronze wire. I bet this is another pair that are wonderfully light to wear too.


Once again thanks to everyone for posting your designs. We will continue to feature a few pairs of earrings every other Sunday and the best way to get your earrings picked is to make great earrings using handmade art components, and to take gorgeous photos. Don't forget to pin them in good time either as these posts often get written a couple of days in advance.

Don't forget to post your links below and the next reveal will be on Sunday 12th May.


Lesley
The Gossiping Goddess

Saturday, April 27, 2013

Do what you love…

Or maybe I should say "make" what you love. I think every artist at sometime or another gets burned out and suddenly "going to work" really does become going to work and creating loses a lot of its bliss. And I don't mean just for that one day or week… I mean when you don't want to make anything. At all.

It can happen for nearly any reason and at any time.

Yep, that was me a couple months back.

If it hasn't happened to you yet, fabulous! But don't freak out too much if and when it does.

So what did I do? Well, I did actually stop making beads for a while. And then I went back to basics and I asked myself what did I love about beadmaking? What was it that had made it so special in the past?

I've never really been one to sketch out my ideas (mainly because I'm not very skilled with a pencil! ;-), but I actually did do some sketching. And I also started long list of all the things that inspire me and all the ideas I've had in the past, but had never taken the time to try. And then I started crossing things off that list.
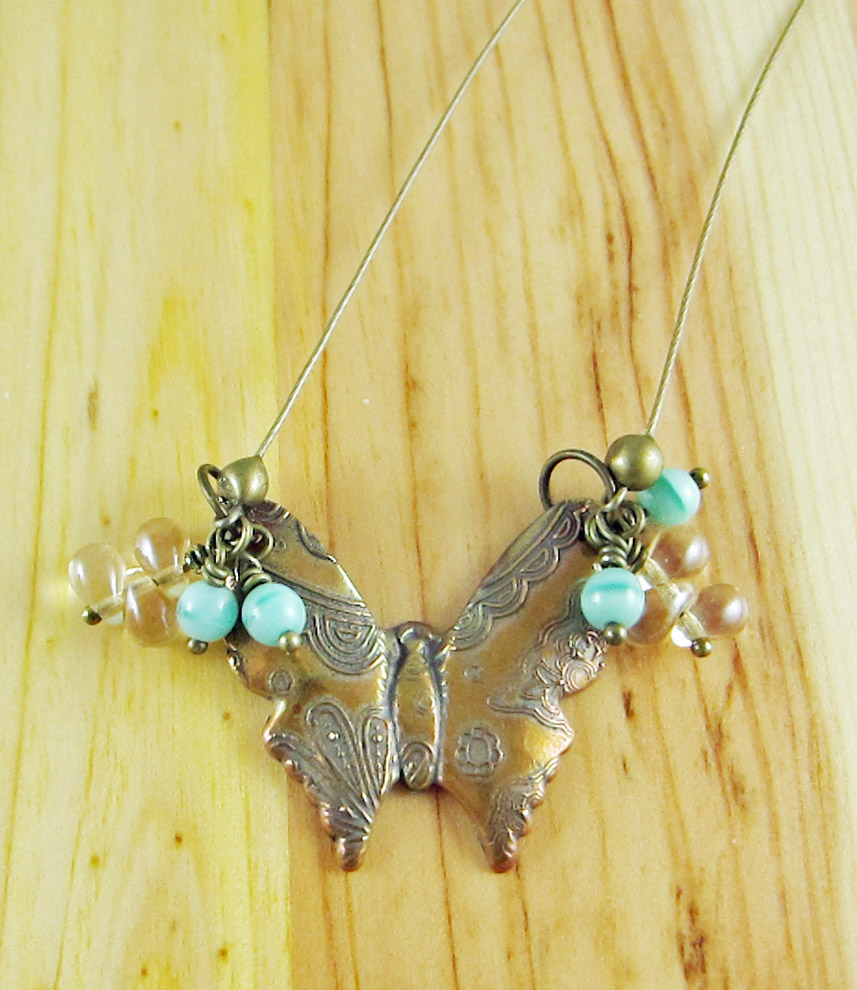
And even more importantly I did what was fun! I didn't take out that long list of things that needed to be made right now, instead I pulled out some polymer and just made what I felt like making. And I enjoyed it! Really enjoyed it!

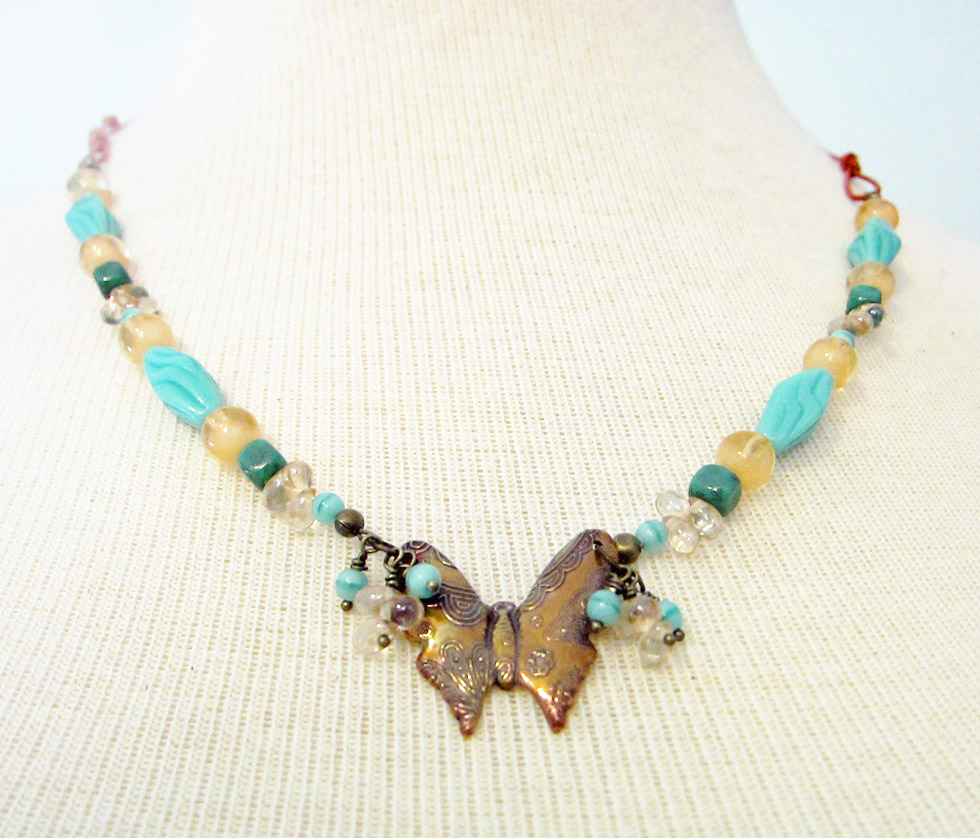
And here's what's happened so far:
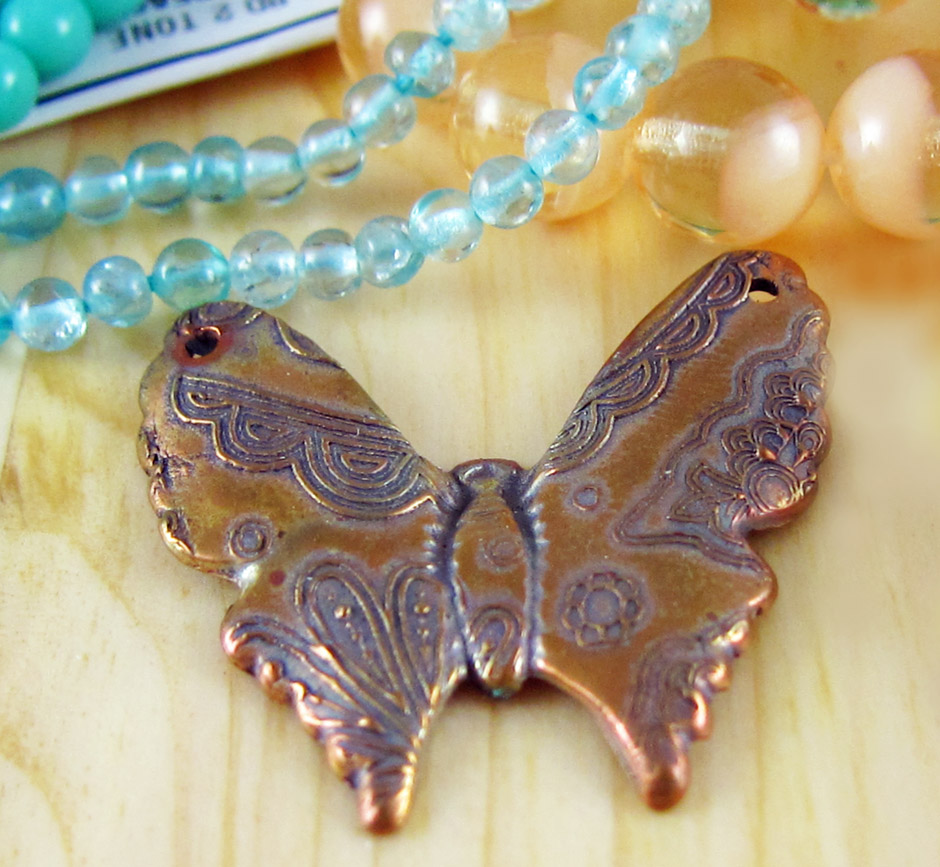


For me, my favorite thing has always been sculpting. And painting comes second. There's something fascinating about transforming a bland, solid color with just some layers of paint.

In my last post you saw the results of one of my "just for fun" ideas… I'd been wanting to try that technique ever since I first started working with polymer clay!

Now every week, I've scheduled out some time to explore and try new things––to really enjoy creating! And to get back to loving what I do… I'm getting there again!


Doing what we love, I think is really what makes us artists. It's what makes us unique from one another even though many of us work with the same medium or use the exact same techniques. We put a passion into our work that makes it truly our own.

Here's to happy creating and fewer burnouts!!


Have you ever gotten burned out? How did you make your comeback? Or maybe you're still working on finding your creative side again? And for those of you who really feel the happiness, what is it that you totally love to create?

Friday, April 26, 2013

Fly Away

Sweet freedom whispered in my ear 
You're a butterfly 
And butterflies are free to fly
 
Fly away, high away, bye bye 
Elton John

On May  3rd and 4th I will be helping fellow AJE team member, Kristi Bowman, with her booth at the Whole Bead Show in Lynnwood, WA. I'm looking forward to spending a couple of days with Kristi and getting a behind the scenes view of what it is like to be a vendor at a bead show.

In preparation, I have been making some jewelry to wear to the show, using Kristi's metal clay components.  I took pictures of each step of the design, so I could share my thinking, as it developed during the process. I began with Kristi's bronze clay butterfly.  I've been hoarding this for awhile, so it was time to put this little beauty to use.


My first step is the jewelry design equivalent of brainstorming.  Anything goes.  I think freely and creatively at this point and pull out all the beads that could conceivably be used in the design.  In this instance I wanted a peach and turquoise necklace.  Here's my brainstorm pile of possibilities.


I bought the burnt orange leather cording on the way home from work yesterday.  Unfortunately, it was only available in a 1 mm size and I was worried it might be too thick.


My fears were well founded.  Only the large turquoise beads fit on the leather.  Drat! After some thought, I figured I could string about 5-6 inches of beads on either side of the butterfly, using brass colored stringing wire.  Then I could use the rust orange leather to complete the back of the necklace.


So with this new plan in mind, I started editing my beads and organizing them.  I was looking for beads whose size would be proportional to the fairly small butterfly pendant.  I also wanted a variety of shapes and textures. I chose oblong, textured turquoise beads and round peach beads that are part opaque and part  translucent.  I added some light peach teardrop shaped beads that create a zig-zag pattern and some slightly darker turquoise cube shaped beads.


I decided I wanted some dangles on either side of the pendant, so I threaded some beads onto ball end brass head pins and laid them out by jump rings that I attached to each wing.


At this point I had some tentative designs floating through my head, so it was time to get started.  I attached the dangles to the jump rings and crimped on my stringing wire,


I came up with two possible designs and strung them both to see which I liked best.  I chose the one on the left, although, in the end, I tweaked it again.  Once I decided on the final version, I strung both sides to match.


Then it was time to add the leather.  I tied largish loops on the ends of the leather and made a small loop of the stringing wire around the leather.  I crimped the stringing wire and covered the crimps with crimp covers. On the other end, I tied knots as close to the ends of the leather as possible and then glued the leather inside the brass bead caps.  I added the clasp on one side and a short chain on the other side, so the necklace would be adjustable.  I made a little dangle to decorate the end of the chain.


Now I'm all ready to help Kristi at the show.  Well....not quite ready.  I still need earrings.  Come back to the AJE blog on Sunday for our earring reveal blog hop.  I'm making earrings to accompany my new necklace!

Thursday, April 25, 2013

Wire Macrame Earring Tutorial


When I submitted these earrings for the AJE challenge a few months ago a lot of people asked me about the the wire macrame technique so I decided to put together a tutorial which you can adapt to your own design. I had a little difficulty photographing this today as it's a two handed technique and my tripod has gone awol but you can find the basic knotting technique here if you need clarification.

Materials 

Approx. 6" 0.9mm bronze core wire
Approx. 12" 0.5mm bronze knotting wire
2  focal beads
2 accent beads/dangles
1 pair of earwires
Headpins/wire
2 pairs of pliers
Table vice or something to secure your wire

Note: Different types and gauges of wire can be used for this and these will give different effects but remember that you may need to adjust the length of the wire according to the gauge used.

Step one
Secure your core wire to something that will keep it firmly in place -  I use a table top vice but you could also wrap it round a rigid object - don't forget to cut extra wire if you do the latter.


Step 2
Place your knotting wire beneath the core wire and bring both ends up around the sides. Pass the wire on your left over the wire in your right and back under the core wire and up through the loop of the wire on the right.


Grip both ends of the wire with your pliers and pull to tighten keeping an even tension. Don't be tempted to do this with your hands (especially with bronze wire) - it may not hurt at first but you'll find you have very sore fingers the next day - I know I tried!


Step 3
Repeat step 2 taking care to pass the wire in the same direction as this will create the spiral pattern.


 Continue repeating step one and the spiral pattern will begin to emerge...


Step 4
When the spiral is the length you want remove it from the vice and wrap one end of the wire around the core wire 3 times, cut off the excess and press against the core wire. Repeat the process with the other end of the wire wrapping it over the first wrap. Trim the excess and file any sharp edges.  This will form the top of the earring.


Step 5
Trim the top end of the core wire to remove any vice marks, file the end and turn a simple loop. Gently push the spiral up to sit snugly against the loop.


Step 6
At the other end add your focal bead, trim and file the wire and turn another simple loop or warp a loop if preferred.


Step 7
Add a headpin to an accent bead and turn a simple loop to create a dangle then add this to the bottom of your earring.

Step 9
Add an earwire of your choice.


Step 10
Repeat this process for the second earring to complete the pair.


Step 11
This technique is greatly enhanced by oxidising the wire and polishing back the high points to give added depth and texture. I've done this when the earrings are complete but if your beads are not waterproof you will need to treat the wire before you make up the earrings.


And there you have your wire macrame earrings.

I hope you'll have a go at making these and perhaps we'll see some of them coming up on the AJE Earring Challenge Pinterest board.

Lesley
www.thegossipinggoddess.blogspot.com

Wednesday, April 24, 2013

Dyed bead disaster!

I recently had an extremely harrowing issue come up and I need to talk to you about it. 

Dyed beads.  Now I know there are some uses for dyed beads and they they come in unbelievable colors.  They draw us in and say "look at me I am the color you are looking for".  I am not saying that they are all bad by any means.  This is just my first experience using good quality dyed beads that have sent me into a tizzy.

Here is what happened.  I often buy seeds because the color calls to me.  I hate to say it but I don't really look at labels.  I began happily stitching a new pattern and as it was coming together I was noticing that the colors were not really what I was looking for.  I first I thought it was one of those issues where in the tube they are gorgeous but individually the just don't show their color when they are not bunched together.  Then something caught my eye.  One of the beads looked cream.  Cream?  I am not using cream!  So I ripped the element I was working on apart and this is what I saw.

Now I need to tell you I immediately looked at the tube and there it was highlighted "Dyed".  OMG!  No way!  I know that the difference seems subtle but let me assure you when using them individually in the project it in your face.

So I asked a few questions of my friends and yes we have all had a horrible dyed experience.  Mostly cheap beads that we all have purchased when we first started beading.  Then I also learned that there is still a desire for dyed beads.  The are often found in gemstone beads but they can also be found all over.  Most of what I researched says that there are ways to retain the finish but I haven't yet tried those.  I also discovered that reputable bead shop owners will label dyed beads so that you are well aware of what you are getting so my best advise is to check those labels.  If you are unsure of what the finish will do ask your shop owner for their opinion as to if it will work with your project.

Just another handy dandy lesson learned that I thought I would share with you all.

Kristen

Tuesday, April 23, 2013

Chestnut Brown Copper

I love, love, love the deep chestnut brown patina that is possible with copper... but it took me a long time and a lot of experimentation to perfect the process so I could get it consistently. The thing I love best about this is that the resulting patina is very dimensional, which may be hard to see in these photos - but give it a try yourself and you'll see.

Start with a copper piece that has been pickled, neutralized, and brushed clean with a brass brush. The "neutralized" part of that is really important - use baking soda in solution with tap water. Un-neutralized pickle on a piece of metal can react to the patina and sealants over time.

This piece is really clean - what you're seeing are reflections on the metal.
Place the piece on your soldering block (choose a clean spot!) and gently heat it with your torch until it darkens. Make sure it's completely dried off before you do this, since the water can leave mineral deposits on the metal as it rapidly heats and evaporates.


Quench the piece, then use a green scrubby and running water to clean it. Don't use soap! Just the green scrubby and a little elbow grease will be enough to brush back the patina on the high points and even out the color. Be sure to dry the piece thoroughly before moving on to the next step - any water left on the piece will dilute the patina as it comes in contact with the metal.

Sorry this is a little out of focus!
Get your work area set up with the darkening liquid patina of your choice and either running water or a water bath nearby. I use Novocan Black in this demonstration, but liver of sulphur gel works great too. Then, quickly submerge your piece in the liquid and take it right back out, putting it in the water bath or rinsing it under running water. Really: just dip it in and take it out, then rinse it thoroughly.


Repeat this step several times - dry off the piece, dip it quickly into the patina, then rinse thoroughly. Every other dip in the patina, use the green scrubby to even out the color - no soap or cleanser, just the scrubby and some water. After anywhere from four to six dips in the bath, you'll have a beautiful, even deep brown patina with highlighted texture.

Sorry this one's out of focus too!
Put the piece in a tumbler for at least an hour - if you have a vibratory tumbler, you can get the same effect in 20 minutes or so. You're looking for a deeply burnished surface that glows, and you'll start to be able to see the dimensionality of the patina.


Toss in a piece of large link copper chain to tumble with your piece - it helps create a random organic texture.

After an hour of tumbling, these pieces have mellowed to a beautiful, deep chestnut.
Use your fingers to rub a little bit of Renaissance Wax (I love that stuff!!) into the surface of the piece. A little goes a long way, but you want to make sure you get thorough coverage. Set the piece aside and allow to dry for at least 15 minutes - longer is better. Then buff with a soft cloth.


All of these pieces have had Ren Wax applied, but only the center one has been buffed. Note the matte appearance of the other two?

The Renaissance Wax will continue to harden over several hours - this is my favorite finish of all because it is so durable and imparts such a pretty glow - not too shiny, just right.

All the pieces buffed.
So that's how I do it - I get consistently deep, rich, dimensional color and beautifully highlighted textures with this technique, and the finish is extremely durable and stable.

Do you have any tips to add? How do you add patina to your copper?

Until next time!